
You are using an out of date browser. It may not display this or other websites correctly.
You should upgrade or use an alternative browser.
You should upgrade or use an alternative browser.
How To Post With Breathe Right Strips
- Thread starter Archer
- Start date

Archer
Hot Topics Subscriber
You need to keep posting through teething otherwise you risk the ears falling. Most of the time this is around 7 months of age.Archer... when you say 5.5in crop, where do you measure from? The top of the head to the tip of the ear?? Sorry I am new to all this! Also my girl's one ear is just a bit wiggly at the tip when she run's, do you guy's recommend trying the breathe right strip's? I am still posting because she is 5 months old and still teething and I would rather be safe then sorry! Appreciate any help!
The length of the crop is measured from the base of the ear to the tip.
Archer
Hot Topics Subscriber
How old is Shadow?Thank you for posting this. I was going to try this with Shadow this month.

My2Girls
Notable member
Shadow just turned 8 months. Unfortunately I haven't taken the time to figure out how I can post pics on here from my iPhone - says it's too large. Otherwise I would attach a pic. I just started to test to see where the ears are at. So far they are on day 3 still standing but the tips flap when she runs. Do you think I should go the whole week to get a better measure?
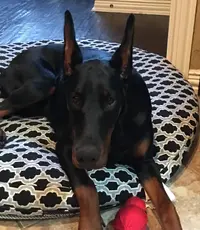

She's a pretty girl and her ears are looking great!
You could try it as long as you're ready to post right away if they start drooping at all.Do you think I should go the whole week to get a better measure?
Archer
Hot Topics Subscriber
Where the ear flap goes into the headNot quite sure what is considered the base of the ear or not, but if I measure from the top of her head to the tip it is roughly about 3 3/4 inches(hard to get her to sit still lol)

davidjanaflora
New Member
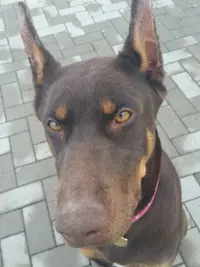
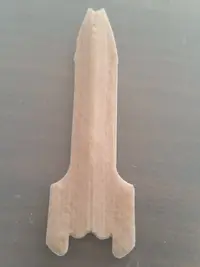
Thanks to this method my girl is now ok. We have problems as you can see on the picture with the right ear.
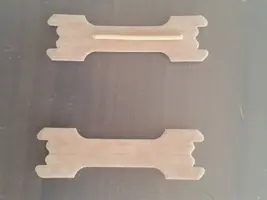
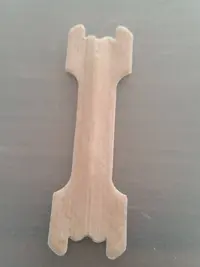
I use two pieces of BRS and between I put wooden stick.
I use two pieces of BRS and between I put wooden stick.
Attachments

Kennettmo2
Novitiate
How many days do you leave the BRS before removing and replacing? ( every three or four days like when I posted? Or just leave until they come off?)So you think you're done posting with backer rod, but the ears aren't quite standing like you want. You might have a solid base, but the tips might flop a little bit. Have no fear, there's an answer. Breathe Right strips!! Yes, Breathe Right strips. The product that's helping the nation with snoring cessation and saving marriages everywhere could be just what you need to perfect your dog's ears. And here's how.
WHAT YOU NEED
- Breathe Right Strips (I like the EXTRA as they are a bit stronger)
- Artificial nail glue
- Nail Polish Remover
- Isopropyl Alcohol or alcohol pads
- Cotton balls
- Scissors
- Zonas tape
- Permanent marker
- View attachment 30502
Don't forget the cute, unposted Doberman puppy
View attachment 30486
STEP ONE
Here you can see where I cut the strip to better fit her ear. I did not take a photo of the ear tracing, but it's pretty straightforward.
- Remove Breathe Right strip from package.
- Put tip of strip to tip of puppy's ear. Draw along edge of ear on to the strip so you are tracing the width of the ear on the strip. Make sense?
- Cut the strip along the lines you drew. This should fit the width of your dog's ear at the tip where you will be placing the strip.
View attachment 30487
View attachment 30488
STEP TWO
- Recheck size of strip you cut to make sure you don't need to make any adjustments. Recut if necessary.
View attachment 30503
- Using cotton balls and alcohol, or your alcohol pad, gently clean the inside of the ear flap of any dirt or oil. I clean from tip to base, concentrating on where the strip will be. Allow to dry.
- You can also shave the inner flap of the ear where the BRS will be attached. This seems to make it easier for the strip to adhere to the ear. If you do shave the ear, clean the ear flap with alcohol after you shave.
STEP THREE
You can kind of see what I did here. I had not put the glue on the bottom tab yet as I was taking the picture and didn't want to get the glue on my hands.
- Using your nail glue, apply 1-3 drops across the tip of the strip (where you cut). Do only one strip at a time as the glue dries quickly.
- Then put drops down the middle of the strip. I like at least three drops, if not four.
- Then add a few drops across the tip you didn't cut. This will be the part that sticks closer to the base
YOU CAN ALSO USE DUOEYELASH GLUE OR TORBOTS IN THE PLACE OF THE NAIL GLUE. IT SEEMS TO WORK BETTER THAN THE NAIL GLUE. IF YOU USE THE DUO OR TORBOTS, SMEAR IT ACROSS THE ENTIRE LENGTH OF THE STRIP TO ENSURE ADHERENCE OF THE STRIP TO THE EAR.
View attachment 30490
STEP FOUR
View attachment 30504
- Time to glue on the strip! I apply the top tip first. Straighten up the ear by pulling up gently on the tip of the ear, like you do to post. Place strip on tip of ear. Apply slight pressure and hold for a few seconds, still pulling up on the ear.
- Do the same for the center portion.
- Apply the bottom tip to the inside of the ear. Press firmly!
STEP FIVE
This is just a quick picture I snapped. It's of Archer's ears. He volunteered to be an ear model since Aria is currently in posts. It's not the prettiest tape job, but it shows you where to put the tape.
- Sit back and admire your work
- If you want extra reinforcement, you can wrap some Zonas tape across the top and bottom of the strip to reinforce it. Be mindful of the ear fold when taping and tape in it's natural direction.
View attachment 30505
Congrats! You made it! Will be posting a Breathe Right strip removal post int this thread once I take the pictures.
Kennettmo2
Novitiate
Sorry I just saw the answer...the tutorial of using BRS was Great!How many days do you leave the BRS before removing and replacing? ( every three or four days like when I posted? Or just leave until they come off?)

There is absolutely nothing in them. It's just a semi rigid piece of teflon (or something like that) and it holds the tips up very nicely.Ok so haven’t bought these before and was curious about the medicine in them. Is there a backing you don’t peel off then? Have always wondered about what’s in them and if it’s getting into the dog’s system.
You do have to peel the backing off to expose the sticky side so it adheres to the ear and most of us will also use either the surgical adhesive or eyelash or nail glue (forget which one now) to help them stay in place better.
Archer
Hot Topics Subscriber
Eyelash glue ot TorbotsThere is absolutely nothing in them. It's just a semi rigid piece of teflon (or something like that) and it holds the tips up very nicely.
You do have to peel the backing off to expose the sticky side so it adheres to the ear and most of us will also use either the surgical adhesive or eyelash or nail glue (forget which one now) to help them stay in place better.
 Nail glue doesn’t work as well. I need to update this thread. Lol
Archer
Hot Topics Subscriber
The issue with the right ear should be corrected with half posts with 3/8” backer rod. BRS could work, but are not the best optionThanks to this method my girl is now ok. We have problems as you can see on the picture with the right ear.
I use two pieces of BRS and between I put wooden stick.
Where was the answer?Sorry I just saw the answer...the tutorial of using BRS was Great!
You can basically leave them in until they loosen up enough to just pull off with no resistance.Where was the answer?

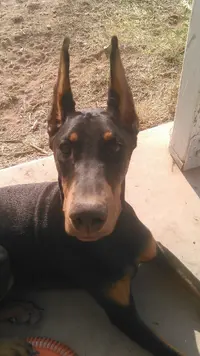

MacPettus
Novitiate
Thank you so much for this informational post! Do you use the nail polish remover to take off the breathe right strip or do you with for the nail glue to wear out and the strip to fall off before replacing?So you think you're done posting with backer rod, but the ears aren't quite standing like you want. You might have a solid base, but the tips might flop a little bit. Have no fear, there's an answer. Breathe Right strips!! Yes, Breathe Right strips. The product that's helping the nation with snoring cessation and saving marriages everywhere could be just what you need to perfect your dog's ears. And here's how.
WHAT YOU NEED
- Breathe Right Strips (I like the EXTRA as they are a bit stronger)
- Artificial nail glue
- Nail Polish Remover
- Isopropyl Alcohol or alcohol pads
- Cotton balls
- Scissors
- Zonas tape
- Permanent marker
- View attachment 30502
Don't forget the cute, unposted Doberman puppy
View attachment 30486
STEP ONE
Here you can see where I cut the strip to better fit her ear. I did not take a photo of the ear tracing, but it's pretty straightforward.
- Remove Breathe Right strip from package.
- Put tip of strip to tip of puppy's ear. Draw along edge of ear on to the strip so you are tracing the width of the ear on the strip. Make sense?
- Cut the strip along the lines you drew. This should fit the width of your dog's ear at the tip where you will be placing the strip.
View attachment 30487
View attachment 30488
STEP TWO
- Recheck size of strip you cut to make sure you don't need to make any adjustments. Recut if necessary.
View attachment 30503
- Using cotton balls and alcohol, or your alcohol pad, gently clean the inside of the ear flap of any dirt or oil. I clean from tip to base, concentrating on where the strip will be. Allow to dry.
- You can also shave the inner flap of the ear where the BRS will be attached. This seems to make it easier for the strip to adhere to the ear. If you do shave the ear, clean the ear flap with alcohol after you shave.
STEP THREE
You can kind of see what I did here. I had not put the glue on the bottom tab yet as I was taking the picture and didn't want to get the glue on my hands.
- Using your nail glue, apply 1-3 drops across the tip of the strip (where you cut). Do only one strip at a time as the glue dries quickly.
- Then put drops down the middle of the strip. I like at least three drops, if not four.
- Then add a few drops across the tip you didn't cut. This will be the part that sticks closer to the base
YOU CAN ALSO USE DUOEYELASH GLUE OR TORBOTS IN THE PLACE OF THE NAIL GLUE. IT SEEMS TO WORK BETTER THAN THE NAIL GLUE. IF YOU USE THE DUO OR TORBOTS, SMEAR IT ACROSS THE ENTIRE LENGTH OF THE STRIP TO ENSURE ADHERENCE OF THE STRIP TO THE EAR.
View attachment 30490
STEP FOUR
View attachment 30504
- Time to glue on the strip! I apply the top tip first. Straighten up the ear by pulling up gently on the tip of the ear, like you do to post. Place strip on tip of ear. Apply slight pressure and hold for a few seconds, still pulling up on the ear.
- Do the same for the center portion.
- Apply the bottom tip to the inside of the ear. Press firmly!
STEP FIVE
This is just a quick picture I snapped. It's of Archer's ears. He volunteered to be an ear model since Aria is currently in posts. It's not the prettiest tape job, but it shows you where to put the tape.
- Sit back and admire your work
- If you want extra reinforcement, you can wrap some Zonas tape across the top and bottom of the strip to reinforce it. Be mindful of the ear fold when taping and tape in it's natural direction.
View attachment 30505
Congrats! You made it! Will be posting a Breathe Right strip removal post int this thread once I take the pictures.
Similar threads

- Replies
- 9
- Views
- 203

- Replies
- 59
- Views
- 5K

- Replies
- 8
- Views
- 1K

